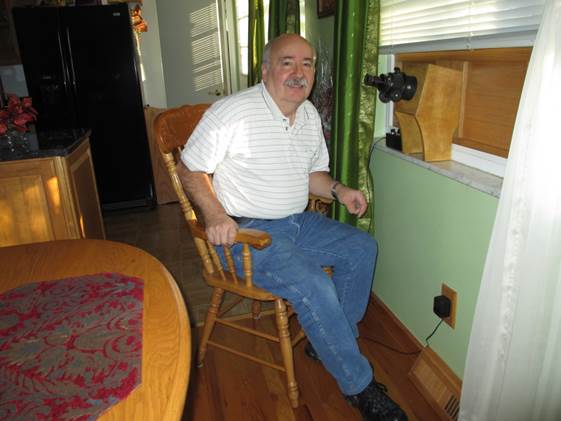
Nothing beats sitting in a comfortable chair on a cold winter night observing the planets! Here is the indoor eyepiece and window panel which are placed in the window of my dining room ready for observing. After seeing Oscar Knab’s article years ago in Sky & Telescope I always thought it would be neat to have such a scope with an indoor eyepiece location especially in winter when my observing is frankly almost nil. Imagine sitting in a comfortable chair indoors at the eyepiece when the temperature outside is numbing cold! Over the years I never had a house with a southern exposure or the right conditions. Finally however I have a house with a southern exposure but with a lot of trees and light polluted skies. Even so I do have enough of a section of sky that I can do some planetary observing at my dining room window.
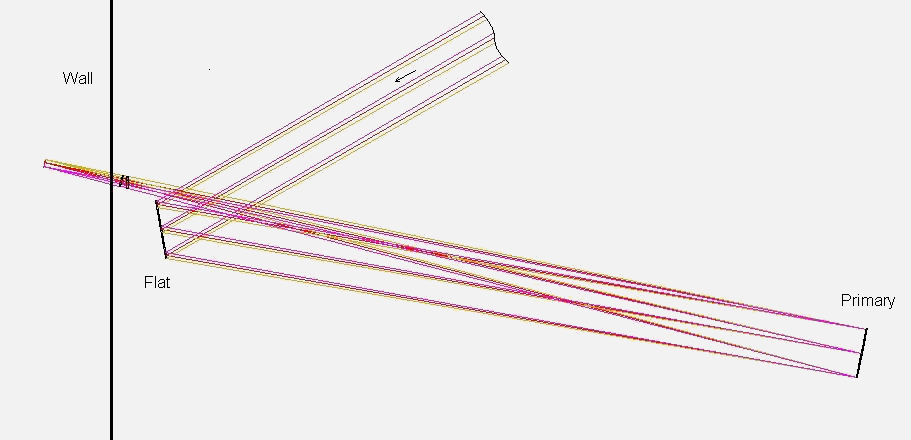
A 12 inch optical flat steers the light into a 10 inch stationary primary
Design Oscar’s polar scope has some advantages but I couldn’t see carrying a long refractor and flat assembly in and out of the house nor was it something I wanted to leave outside permanently out on my patio (my wife wouldn’t go for that). I eventually settled on this design. The flat is mounted on an alt-azimuth mount and feeds light into the primary mirror. The flat is right outside my window and as a result is blocked from seeing anything north of overhead by the house. Even so it isn’t a problem at least for planetary observing. The design is a catadioptric Herschellian. The primary was to be mounted in a box mounted on two posts at the edge of my patio. The distance to my dining room window to this location determined the focal length I needed. At f/17 the tilted primary mirror will have too much astigmatism though and needs correcting elements. I had planned to use a subdiameter Maksutov corrector but later discovered that two tilted lenses worked better especially in the field. These are a weak positive and negative lens that I made. The telescope should give outstanding better than APO performance and is the precursor to the Chief.
2 correcting lenses
Optics The most difficult part of this project was the flat. You can sometimes find these for sale on Ebay if you are lucky. An ATM can also make a flat and you can read my July 1990 article in Sky on the Raleigh water test which is how I made mine. My flat is 12.5 inches diameter and 2 inches thick Pyrex. I measured the distance from the edge of the patio to about 16 inches from my dining room window as 170 inches. I then ground a full thickness 10 inch pyrex mirror to this radius and polished it to a good sphere. I used the Foucault test to obtain a good null making the primary relatively easy to make. The only other optics in this scope are two correcting lenses. These are Bk7 glass although I could have used many other glass types. I could have tried to use off the shelf lenses since you can find them up to 500 mm focal length and 2 inch diameter. The longer focal length of these lenses the better the performance in the field, however, as long as they are located behind the flat. For this reason I made my own lenses starting with two BK7 optical windows. While protecting the other side with plastic tape I generated the curves on these and then lapped them. I poured a pitch lap and polished them using a small polishing machine in my basement. The concave lens can be tested with the Foucault test and the convex tested by interference against a master. That completed the optics for the scope, I could have AR coated the new curves but since I’ll be primarily observing planets I didn’t think the light loss would matter. I silvered the mirrors by chemical silvering both to try chemical silvering and to do testing and debugging before I finally aluminize the mirrors. The silver coat didn’t look as nice as fresh aluminum but worked quite well anyway.
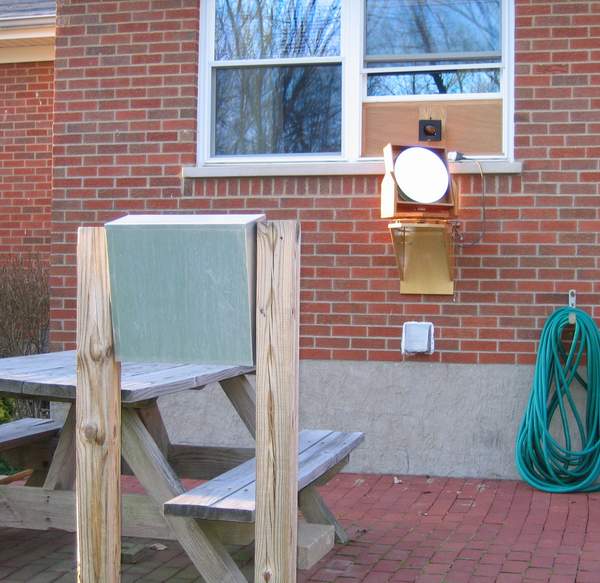
Mirror box for primary mirror
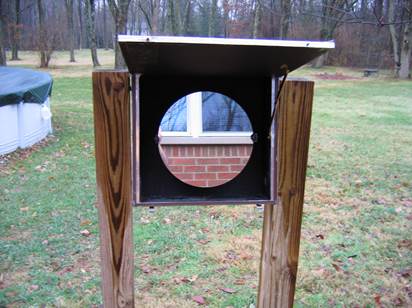
The optical flat sits on shelf and is driven in alt-azimuth . The mirror box is simply a plywood box that I covered with aluminum flashing glued on with contact cement. I also used aluminum tape around some edges that might see moisture. The front panel is hinged and has a weather seal along its back to seal out the weather but can be opened and held in the up position. Inside the box the mirror is supported with a sling and has only three points on the back since the mirror is nearly vertical. The back supports have three adjustment screws with large diameter knobs that can be adjusted from the front side. There are two mirror clips that keep the mirror from falling forward in case the box would accidentally be bumped. Two 4×4 treated posts were sunk in the yard and the mirror box screwed to these posts at roughly 12 degrees from vertical.
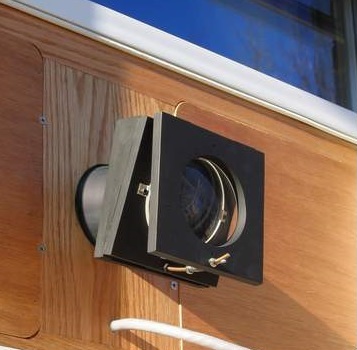
The eyepiece tube, lenses and holders are held in a panel that is removes when not in use (to satisfy wife). A wood shelf is mounted on the exterior wall and also comes off when not in use. It holds an acrylic worm gear and the box holding the optical flat rests on it like a record. A DC gear motor moves it in azimuth and a DC gear motor drives a worm sector in altitude. A box inside controls both motors and is adjusted manually so that the object stays in the field of view and not by computer.

Finding an object turned out to be not so difficult; I put a green laser in the eyepiece focuser and go outside to move the flat manually to put the laser on the object. The long focal length give a very big image scale so I made my own 4 inch eyepiece with nearly a degree field making finding objects easy with the laser. This is a very fun scope to use, more so than I ever thought and gives excellent images with a steady sky.
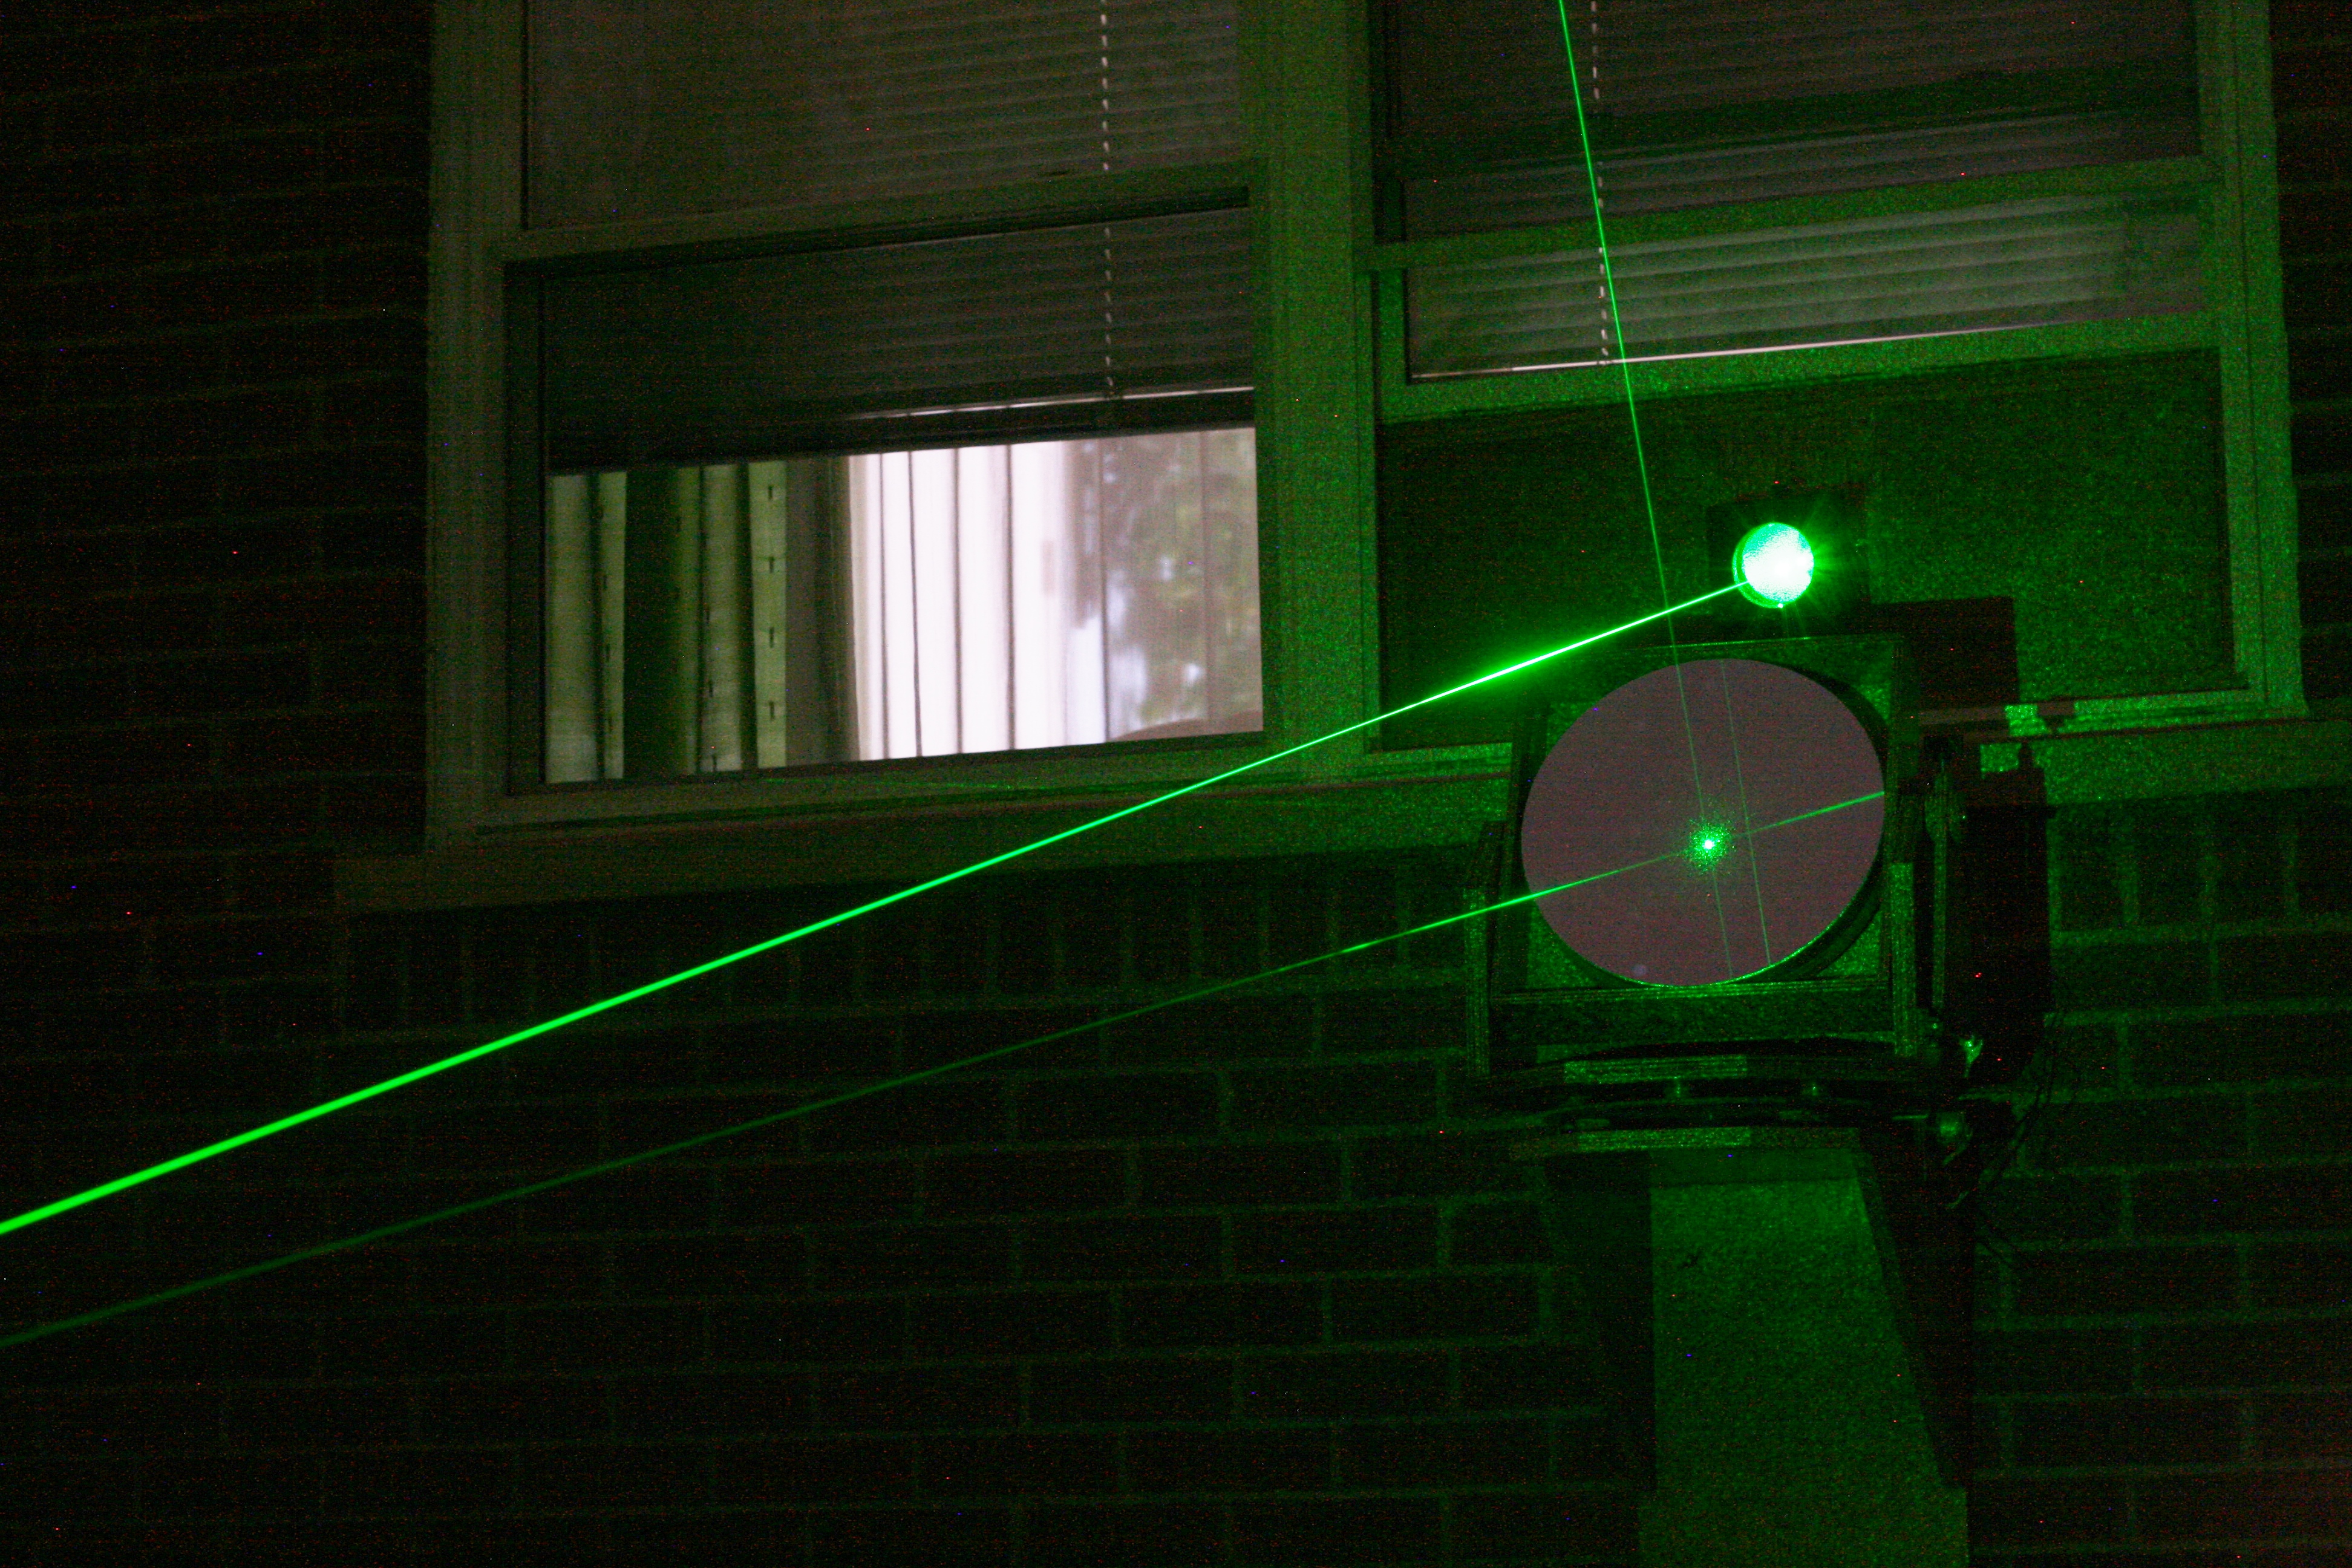
A green laser finder is a simple solution

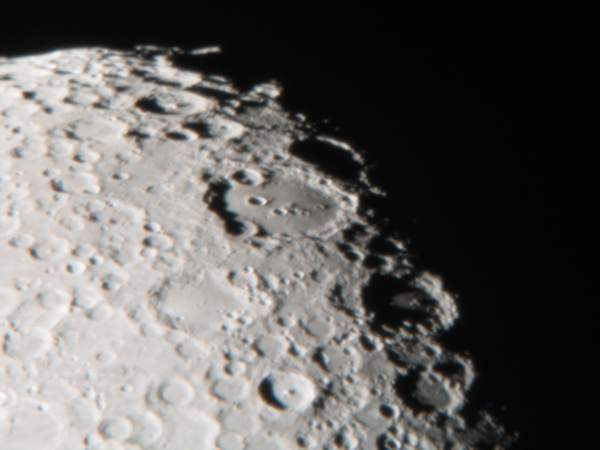
Images are very good, better than this pic shows
